Tools Palette & Inspector Palette
The tools palette contains the icons of the tools that can be used to manipulate a image. When you click on a tool icon, its corresponding settings will show up in the tools inspector palette.
Tools Palette
|
|
Tools for Moving Around
Move (Shortcut 'v') This is your go-to tool to start moving things around in Acorn. You can use the move tool to click on a layer, and then drag to reposition the layer in the canvas. You can also use it to click on graphics in a shape layer to select them, and then drag on a boundary of the shape to resize or rotate.
Zoom (Shortcut 'z') The zoom tool is used for magnifying your image so you can see those pixels up close and personal. It can also be used for zooming out. To zoom in with the tool, simply click, or to be more specific, drag a box around the area you want to zoom in on. To zoom out, hold down the option key and click. Once you start getting familiar with this action, you can also use the keyboard shortcuts (⌘ +) to zoom in and (⌘ -) to zoom out. Also, check out the zoom slider on the lower righthand corner of the canvas.
Crop (Shortcut 'c') The crop tool is for cropping your image down to a smaller size. Use it to define the area of your image you would like to keep. You will notice as you drag it around that there are lines dividing the new image up. These lines are helpful when choosing how to crop an image. Please read up on http://en.wikipedia.org/wiki/Rule_of_thirds for more information. If you make a mistake, place your mouse near one of the borders of the crop area and drag it out to change it. When you are happy with the area you have selected press return to accept, or esc to cancel. |
![]()
Panning / Hand Tool (Shortcut 'h' or hold down 'space')
If you are zoomed in on your image or it is too big for you to see the entire thing on your monitor, use this tool to move your view around. Try out the shortcut of holding down the space bar. Once you get used to it, you will use this tool all the time.
Tools for Drawing and Retouching
![]()
![]()
Paint and Pencil (Shortcut 'b' and ’n’)
This is your most basic tool for getting new pixels down on the canvas. You can adjust the size of the brush and opacity for different results. Holding down the shift key will let you draw in only straight lines.
![]()
![]()
Eraser and Instant Alpha (Shortcut 'e')
The eraser and instant alpha are good for removing pixels from a bitmap image. If there is a layer underneath it, it will be exposed. For more on how layers work, read the layers basics page. You can also hold down the shift key to erase in straight lines. Instant alpha is an erasing tool that has similar qualities to the magic wand selection tool. Click on the color you want erased and simultaneously drag outwards to increase the erasing tolerance, or inwards to decrease.
![]()
Flood Fill (Shortcut 'k')
The flood fill tool works similarly to the magic wand. Instead of selecting an area, the flood tool replaces the color you clicked on with the color currently chosen in the color well. The tolerance setting lets you adjust the thoroughness of the fill. Click and drag outwards to increase the tolerance, or inwards to decrease. Try experimenting!
![]()
Gradient (Shortcut 'g')
Use the gradient tool to fill in your image, shape, or selected area with a gradient. The linear gradient tool will produce a gradient from the point you click to the place where you release your click, while the radial tool will produce a circular gradient expanding from where you initially clicked on the canvas to where you release your click.
![]()
![]()
![]()
![]()
Clone, Smudge, Dodge, and Burn Touchup Tools (Shortcut 'Shift-O')
Holding shift (⇧) and repeatedly pressing "O" will cycle through all the touchup tools. The clone tool is typically used for removing unwanted items in a photo. It can also function as a stamp tool. The smudge tool takes a color from where you start and smears it into other colors of your image, like smearing wet paint. This is useful for removing flaws from photos. The dodge tool lightens the pixels you paint which is helpful if you want to lighten certain areas of your image. The burn tool works in the same way as the dodge tool, only it darkens the pixels rather than lightens them.
Tools for Performing Selections
![]()
![]()
![]()
![]()
Rect, Oval, Free, and Polygon Select Tools (Shortcut ‘shift-m’ or ’s’ to cycle the tools, ‘m’ for the rectangle selection tool)
These tools will allow you to make various types of selections in your image. Use the rectangular selection tool to make a straight rectangular selection, the oval tool to make a round selection, or the freehand tools to make a selection that goes wherever you want. If you have a selection and would like to select another area as well, hold down the shift key while using one of the selection tools and the new area will be added to the existing area. Similarly if you selected something you don't want, you can hold down the option key while using one of the tools and the new area will be subtracted from the existing selection. If that sounds confusing, give it a try and see what happens.
![]()
Magic Wand (Shortcut 'w')
The magic wand tool works by selecting a single pixel, and then expanding that selection out to neighboring pixels that are the same color. You can adjust the tolerance so that there is a little bit more freedom in determining if a neighboring pixel should be selected or not. This is helpful for selecting a uniform background color and deleting it quickly. Play around with tolerance and feathering to improve the result. The tolerance of the wand can be adjusted in the tools palette, or by clicking on the desired color in your image and then dragging outwards or inwards.
Vector Tools
![]()
![]()
![]()
![]()
![]()
![]()
Shapes (Shortcut 'p', 'r', 'o', ‘;’)
Shapes include the bézier, rectangle, ellipse, line, arrow, and star tools. You can easily add a stroke, fill, and corner radius to your shapes from the inspector palette. You can also modify the angle of the shape and apply a drop shadow. Add shapes to your image, then easily edit them later on by using the move tool to select, move, and adjust the shape dimensions. For more options with shapes, check out the 'Shape' menu item.
If you click and hold on the bézier shape tool icon, additional options will appear including bézier freehand, bézier anchor select (shortcut ‘a’), and the reset anchor control points tools (shortcut ‘shift c’).
![]()
![]()
![]()
Text (Shortcut 't')
The text tool allows you to put text onto an image. Select the tool and click once on your image to bring up the text bounding box where you can start typing. Once you are done hit the escape key, click outside the bounding box, or change to the move tool to solidify the text that you have written. By using the move tool you can move the text around, rotate it, and align it however you want. If you hold down on the text tool icon, additional options will appear including the circle text tool and path text tool.
If you are looking for more options with the text, go to the menu item Window ▸ Fonts to pull up the font palette.
Colors

The two color wells represent what is currently set as the stroke color (outer circle) and fill (inner circle). You can tell which color well is currently selected by the blue highlight outline that appears around the selected color well. Click on a color well to select it, or use keyboard shortcut ‘shift-x’. Clicking on the small circle directly below switches the color positions, or you can use keyboard shortcut ‘x’. If the colors aren't currently set to black and white, you can reset them by clicking the yin/yang symbol on the bottom left. The magnifying glass on the right summons the color picker which allows you to select any color in the image or desktop. The color will then show up in the currently selected color well. Some tools such as the brush tool do not require both a stroke and fill color option. When this is the case only one color well will be present.
|
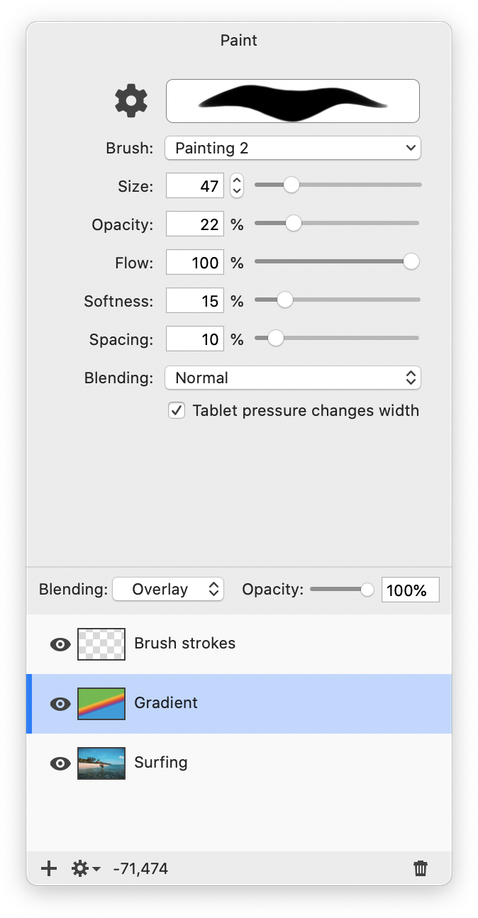
Inspector Palette The inspector palette is where the currently selected tools' options are available. It is also where filter and shape processor options are displayed. As you can see in the image to the right, the paint tool's options are currently displayed in the upper portion of the inspector palette. There are options to modify the brush size, opacity, style of brush as well as open the brush designer. Different tools have various settings you can modify, so be sure to play around and experiment with each tool. The lower portion of the inspector palette includes the layers list, blending modes, opacity slider, and options for manipulating layers. You can read more about the layers list and its various options in the tutorial, 'layers basics'. Located on the upper part of the inspector palette are buttons to switch between the tools, filter, and shape processor inspectors. |
|

