All about DPI, PPI, and Printing

There are a few different factors that go in to determining image print quality, and it can be difficult to understand their relationship to one another. To start, here are a few general definitions of terms:
Pixel Count: The amount of pixels an image contains is the pixel count (for instance, a "10MP / 10 mega-pixel" image has 10 million pixels in it). How the image is displayed on your monitor is determined by this value. In general, the more pixels you have in your image the better it will look since the more pixels there are, the greater the detail. Pixel count is usually displayed in dimensions: "1200 x 900 pixels" or "1200 x 900 px". If you have a digital camera or scanner, you can usually create higher pixel counts by changing the settings of your device prior to taking a picture or scan.
One thing to remember- scaling up an image to increase the pixel count will not make your image higher quality or sharper. Adding pixels to your image this way will only increase the file size, since your computer isn't good at guessing what the extra details should be. It'll just double the existing pixels, not add new and better ones. Scaling down your image however (where pixels are thrown out) does not have this problem. Scaling down will usually result in a loss of quality however.
Physical Size Dimensions: This is usually displayed in centimeters or inches, such as "5 x 7" or "4 x 6". When printing to typical photo sizes, you will need to accordingly resize your image to fit standard photo printing dimensions if they aren't already the appropriate size. Displaying the ruler (⌘-R) will show you your image dimensions. You can also control-click on the ruler to change the units that it uses (pixels, inches, or centimeters).
Pixels Per Inch (PPI): Refers to printing resolution quality and is measured in "pixels per inch" or PPI. In general you do not want to go lower than 180 PPI for acceptable printing results. 360 PPI is a typical standard for high quality printing results. Many web images and computer images are at 72 or 96 PPI. DPI (dots per inch) is another term that is occasionally used interchangeably with PPI when discussing resolution. DPI is a measurement of printers, not a measurement of a digital image. Typically a printing DPI value of 300 produces good quality photos.
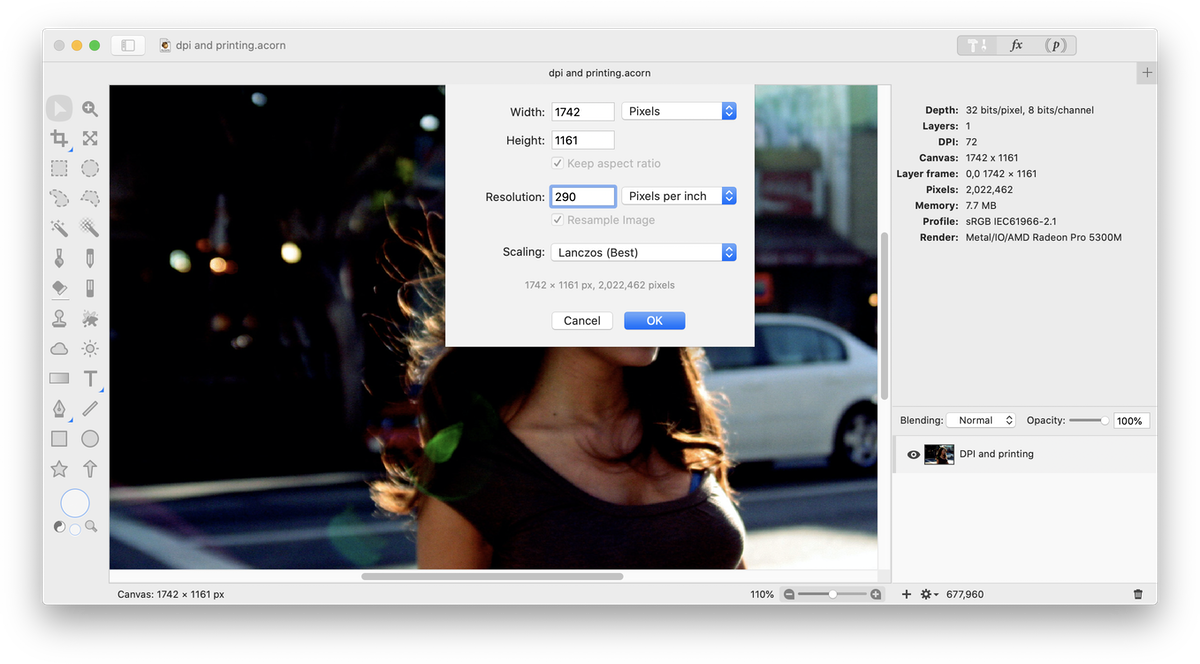
Resample Image: This is an option available under Image ▸ Resize Image. If you are changing the PPI of your image in order to improve printing results, you want this box unchecked. If you have "resample image" checked when increasing the size of your image by adding pixels, you are increasing the number of pixels without increasing their density. This will result in poor printing appearance.
The Math!
Example 1: Pretend you have an image that is 1600 x 2400 pixels with a PPI of 240. You want to know if your image will have good printing results at a size of 4 x 6.
To figure this out, multiply the PPI by the size dimensions you desire: (240 x 4) and (240 x 6). The results are 960 x 1440 pixels. Since your image is larger than these dimensions, and your PPI is greater than 180, you should have good printing results.
Example 2: Your image has a PPI of 72. The print shop wants your image to have a minimum PPI of 300. Your original image size is 1200 x 1800 pixels. You want your image to print out as a 4 x 6 photo. You want to make sure that by increasing the PPI of your image (and unchecking the "resample image" option), you are still going to have a good quality print outcome.
Divide the pixel count by the PPI you have set: (1200/300) and (1800/300). The results are 4 x 6. You should have a good quality print outcome since your PPI is greater than 180, and the boundaries of the image exactly match the print size you desire (if the boundaries turned out to be larger then you would still be okay).
Example 3: You want the highest PPI possible for your image to be able to print at 5 x 7. The image pixel count is 1500 x 2100 and its current PPI is 72.
Divide the pixel count by the image dimensions you want: (1500/5) and (2100/7). The result is 300. You can set the PPI to 300 (with "resample image" unchecked) for the best printing results.
Learning by Example
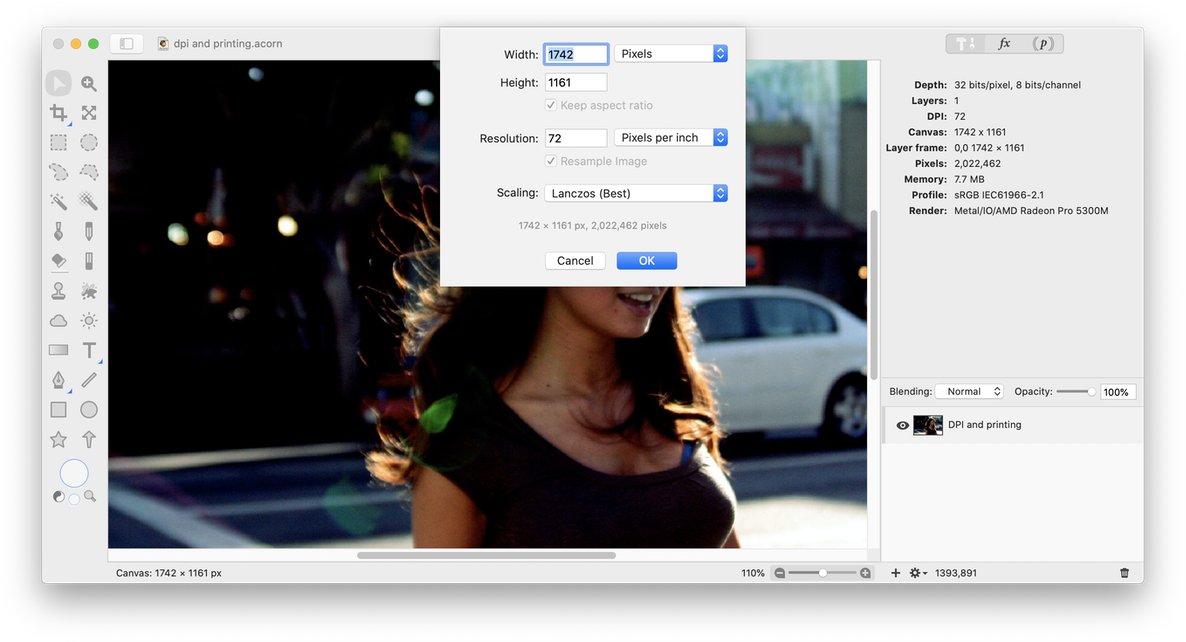
You want to print the image below as a 4 x 6 photo. Its original pixel count is 1742 x 1161 with a resolution of 72 ppi.

You aren't sure by how much you can increase the PPI to improve your printing results, so you get out your calculator. Divide the pixel count by the dimensions you want your image to print:
(1742 pixels/6 inches) = 290.33 (1161 pixels/4 inches) = 290.25
It looks like you can increase your PPI to a maximum of 290 and your image will still be large enough to fit in the 4 x 6 dimensions. Enter 290 in the resolution box.

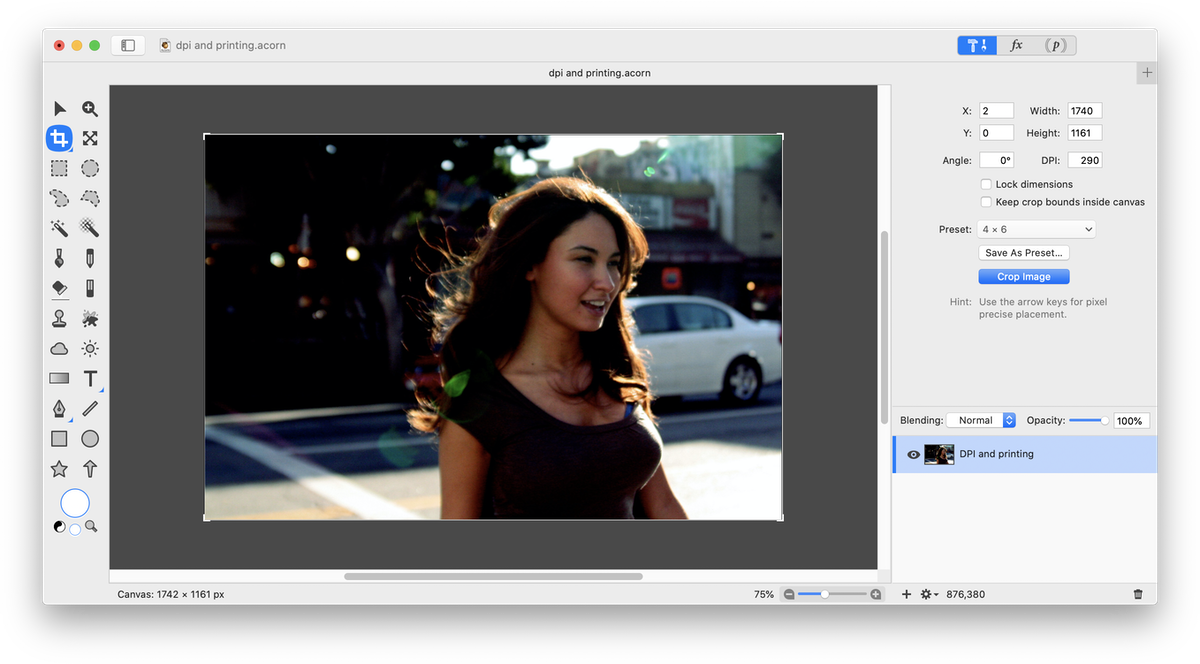
Now you need to make sure your image is sized appropriately for a 4 x 6 print. Select the crop tool. It is easiest to use the preset crop values. For this example we want to hold down the option key while selecting 4 x 6 in order to swap the width/height, or use keyboard shortcut 'x'.

Click "crop image" once you have your crop lined up the way you want. Be sure to "save as" a different file name so that you don't lose your original image file. Your image is now ready to print at a 4 x 6 size with the highest quality resolution possible with the original pixel count.
Key Points
- You will lose image quality if you try to increase the pixel count of an image beyond its original dimensions. It is better to change the settings on your digital camera or scanner to create a higher pixel count in your images in the first place.
- It is helpful to use the crop tool presets to resize your image to standard photo dimensions. Be sure to hold down the option key when selecting a crop preset if you want to swap the width/height values.
Helpful Links
Photo Credits