Selection Tools
Selection Basics
![]()
![]()
![]()
![]()
![]()

The selection tools allow you to isolate a specific area of your image and then work in that area without altering the other areas of the image. Acorn gives you a handful of ways to make selections on your image including the rectangle, elliptical, freehand, polygonal, and magic wand selection tools.
The shortcut key for switching to a selection tool is shift - M. Pressing shift - M multiple times will then cycle through all the selection tools. To remove a selection, choose the menu item , or use the shortcut ⌘D.
Acorn will remember your selection when you save your image. If you have a selection, save your image as a .acorn file. You can close your file and quit Acorn. When you re-open the image, your selection will still be there. The rectangle selection allows you to make rectangular selections and the elliptical selection tool allows you to make oval selections. The freehand selection tool allows you to make freehand selections. This is great if you have a selection that does not fit in a box or a square. The polygonal selection tool allows you make odd selections, but by making multiple clicks. You can finish off your selection with a double click.
The magic wand selection tool will select areas of the same color that you clicked on. You can adjust the tolerance (how close a color has to be to the one you clicked on) in the selection palette. For a live adjustment of the magic wand tolerance, you can click on the color in your image and drag the magic wand on the canvas inwards (to decrease the tolerance) or outwards (to increase the tolerance). If you have the "Contiguous Wand” box checked, you will select only those same-colored pixels contiguous to the ones you click. If you want to select all the pixels in the layer that are the same color as the one you clicked, uncheck the "Contiguous" setting.
Resizing the Selection Marque

You can resize the selection bounds by clicking the “Resize…” button in the Selection palette. This will bring up a palette similar to the one you would use when resizing a layer. From here you can change the dimensions or location of the selection (without moving your layer pixels). Click the “Apply” button when you are finished.
Quick Mask
Quick mask mode can be found under the menu item. Quick mask mode is an additional way of making selections in Acorn, and can be combined with other selection tools such as the magic wand to refine a selection. You can use the brush, eraser, and even filters when quick mask mode is enabled.
When you enter quick mask mode, it helps to think of your selection as a virtual layer which happens to be either red tinted or clear. Painting with the color white in quick mask mode removes the tinted color overlay. Painting with black restores the color overlay. Anywhere you paint with white is where your selection will be, and when you exit quick mask mode the clear overlay (which you painted with white) will change into a standard selection. Toggle with keyboard shortcut q to view your selections within and outside of quick mask.
For more detailed information on how quick mask mode works, read the quick mask tutorial.
Select Subject and Mask Subject
Acorn can use Machine Learning / AI to automatically find the main subject in an image and either select it or mask it . This can be a big time saver when you want to remove a background from an image.
Preset Selections, Selection Size, and Making Selections Fit Exact Dimensions
Acorn offers preset selection dimensions under . If you want your selection a specific size that is not a preset, you can use the Resize… button in the selection palette to alter the dimensions of your selection.
We also provide a tutorial for earlier versions of Acorn where you can make selections by using the shape tools.
You can view the width and height of your selection in the inspector palette, as well as in the lower left hand corner of the status bar of the image's window. The status bar also displays the x,y coordinates of the selection.
Feathering a Selection
The feather command will soften up the edges of your selection. You add a feather by using the Feather settings in the Select palette (and you can later change your feather amount or remove it by setting it to 0). The higher the feather radius, the softer the edges of your selection will become.
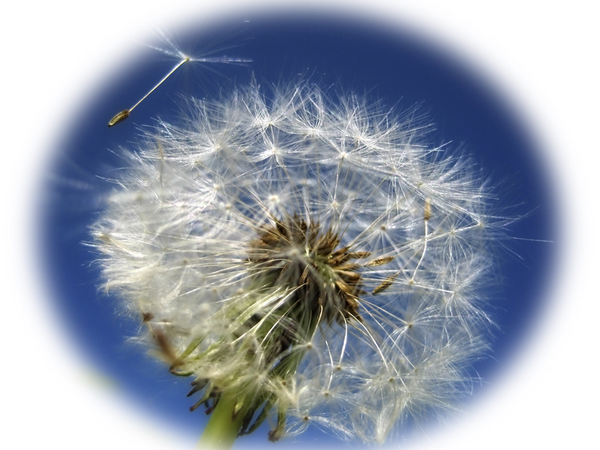
The image to the right was made by creating a circular selection, feathering with a radius of 40, then using the menu item, and then using white.
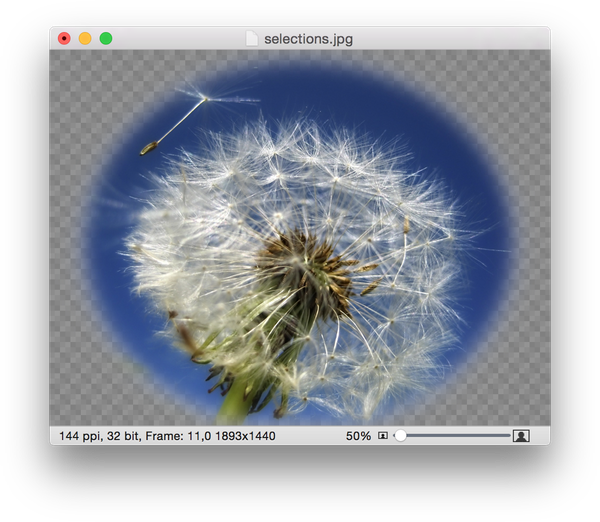
View Selection Clipped Out vs. Marching Ants
There are two different ways to view your selection. There is the traditional “Marching Ants”. The image to the right is showing “clipped out”. Clipped out shows the area outside of the selection with a darkly tinted transparency.
Is there an advantage to using one or the other? Not really- but it turns out some folks really like the clipped out look, and others like the marching ants. You can alternate between these two options via or use shortcut ⌘\.
Moving Selections
To move a rectangle or elliptical selection you are actively drawing, hold down on the space bar while dragging. Let go of the space bar to continue adjusting the size and shape of your selection.
Once you have made a selection, you can move it around with the arrow keys or move tool. In addition to this, you can hold down the ⌘ (command) key and Acorn will first cut out the selection and then move it around your image. Letting go of ⌘ will then place your floating selection.
You can hold down ⌘ and ⌥ (option) when clicking and dragging (or while using the arrow keys), and Acorn will continually copy and place your selection each time you release your click. Here is a video of it in action, using a screenshot of Acorn's settings window: Command Option Move in Acorn.
Rotating and Transforming Selected Pixels
To rotate and transform a selection, go to . You can scale your selection keeping the aspect ratio intact via on-canvas controls, via percentage, or via manually entered values in the inspector palette. You can rotate your selection by dragging on the canvas, or setting the specific angle in the palette. Uncheck the ‘keep proportions’ box in the inspector if you wish to resize the width and height of the selection independently.
Perspective Transform allows to you transform via handles located at each corner of a rectangle surrounding your selection. Moving the handles independently creates the illusion of perspective.
Flip Layer Horizontal/Vertical will flip your selection horizontally or vertically.
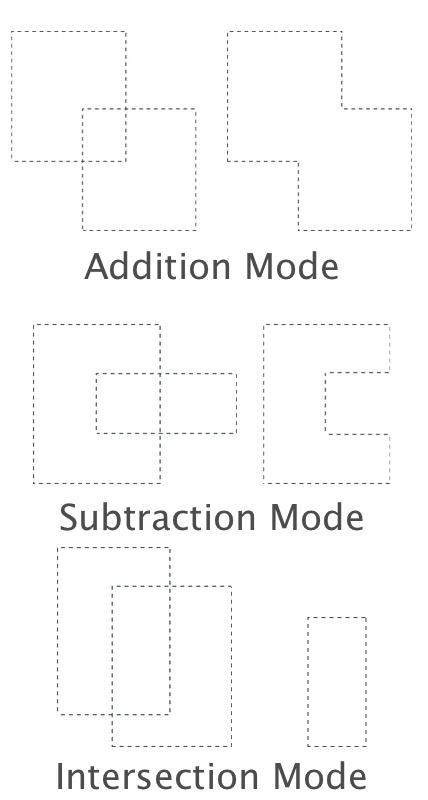
Addition, Subtraction, and Intersection Modes
![]()
There are four selection modes available in Acorn. They include: regular, addition, subtraction, and intersection modes.
Addition - When two or more selections overlap, they will be joined together to create a single selection encompassing all areas of the original selections.
Subtraction - When you draw a selection over an existing selection, it will remove that area of the original selection.
Intersection - Where selections overlap, only the area of overlap will be retained as a selection.
Selection Tips & Keyboard Shortcuts
To draw a perfect circle (or square), hold down the shift key after you have started your selection.
When in the process of creating an oval or a rectangular selection, you can press the spacebar to reposition the origin of the selection.
To grow a selection from the middle of where you clicked, press the option key after you have started your selection.
To bring back your last selection, choose the menu item.
Double clicking a thumbnail in the layers list will make a selection out of that layer.
To add to a selection, hold down the shift key before you start your selection. The selection cursor will change to include a plus sign.
To delete from a selection, hold down the option key before you start your selection. The selection cursor will change to include a minus sign.
If you have a fully vertical or horizontal selection, holding down the option key will turn the menu item into “Trim Out Selection”. Trim out selection deletes the current selection and squishes the two endpoints of your image together (bitmap layers only).
To convert the current selection into a layer mask, choose the menu item when your selection is active.
Keyboard shortcuts for making selections from layers include holding down the command key while clicking on a layer in the layers list to make a selection based off using the layer image as a mask. If you hold command and the shift key, the new mask will be added to an existing selection, command and option will subtract, command/shift/option will intersect.
If you use the arrow keys with a selection (and a selection tool is active) and hold down the option key, Acorn will copy the selection in the direction you press with the keys, thus extending the selection by a pixel (or 10 if you also hold down the shift key).
After drawing a selection you have the option to convert the selection to a bézier shape via the menu item.
Add a stroke to selections using the menu item. Options for fill, stroke, blending, and anti-alias will be available in the inspector.
Additional Relevant Documentation
Selection Basics (video tutorial)
Quick Mask
Quick Mask Basics (video tutorial)
Selecting Basics