Rulers, Grids, and Guides
Rulers
Sometimes things need to be lined up perfectly and relying on human eyes isn't necessary with Acorn. Rulers can be found under View ▸ Show Rulers (⌘ R). Rulers will be displayed around the canvas on the top and left hand sides. The measurements the rulers can display are pixels, inches, and centimeters. To change the measurement unit, right click on one of the rulers. The bottom left hand corner of the canvas is the (0,0) point on the x,y axis. If you want to change the (0,0) point to the top left of the canvas, go to Acorn ▸ Settings ▸ General.
Grids
To place a grid on your image, choose View ▸ Guides and Grids ▸ Show Grid. To modify the grid spacing, choose View ▸ Guides and Grids ▸ Grid Settings. You can then modify the spacing, color, and appearance of the grid. Grids can be great for lining things up in your image. To have a layer, selection, or shape snap to the grid, make sure ‘Snap to Grid’ is checked under View ▸ Guides and Grids.
Guide Basics
Guides can be created by clicking on either the horizontal or vertical ruler and dragging it out onto the canvas. To move a guide, click and drag on the guide with the move tool. Notice that as the guide is moved around on the canvas, the measurement number changes based on where the guide is located. If you are placing a horizontal guide then the number reflects where you are on the vertical or "y" axis and if you are placing a vertical guide it is where you are on the horizontal or "x" axis.

Guides can be hidden, cleared, locked, and created under View ▸ Guides and Grids. They can also be deleted by dragging them off the canvas. Guides can additionally be created under the canvas contextual menu (right click on the image to bring this menu up). Guides will not print on your image and are not visibly present when you "print preview".
If you have guides present and you want to resize your canvas, there is a check-box option in the resize canvas window to have the guides move to stay in position relative to the resizing, or to remain at their current location.
Aligning with Guides
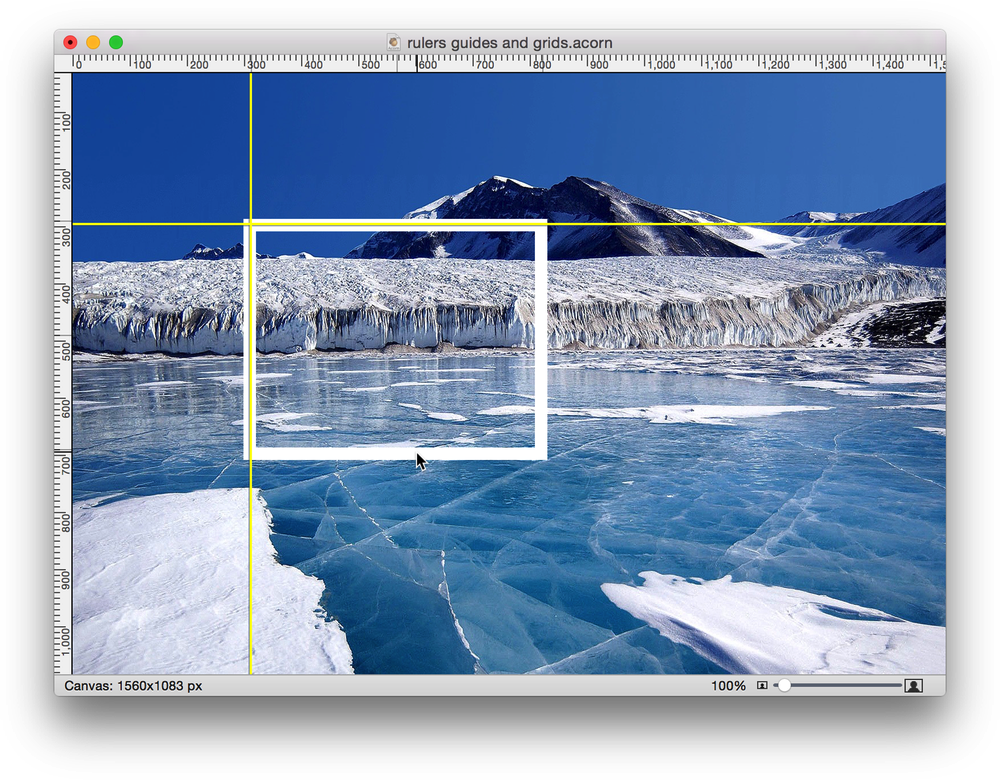
If you have created guides and want to align layers perfectly to them, click on the move tool. Make sure "Snap to Guides” is checked under the View ▸ Guides and Grids menu item. This will take the guess work out of getting your layers to align perfectly on the guides. The guides that can be "snapped to" will turn yellow to let you know which guides are being used. You can align your layer by its outer boundaries, by its horizontal or vertical center, or by a combination of those options. In the image below, a rectangle shape is aligned at its upper left hand corner with 2 guides.
Pro Tip
Did you know you can use basic math equations in Acorn's numerical fields? This can be super helpful when placing guides. Choose View ▸ Guides ▸ New Guide. To place a vertical guide at the center of your image, select the 'Vertical' option and in the 'Location' field enter the width of your image multiplied by 0.5 (or divided by 2).

Taptic Feedback
Taptic feedback for snapping guides is available on OS 10.11+. To hear a “tick” when aligning and snapping guides go to Acorn ▸ Settings ▸ Guides. Check the ‘audible snaps’ box.
Aligning without Guides
Under the View ▸ Guides and Grids menu item, there is an option to "Snap to Canvas”. If this is checked, when you drag your layer, selection, or shape around in the canvas the edges will "snap" to the boundaries of the canvas. In addition, the horizontal and vertical center of the layer, selection or shape will also snap to the horizontal and vertical centers of the canvas. You also have other options of aligning including snap to layers, shapes, and grid to get everything in your image placed exactly where you want it.
Snapping Settings
To set up your snapping settings, go to the Acorn▸ Settings ▸ Guides menu item. From here you can choose your defaults for snapping as well as preferred grid spacing. If you wish to change snapping behavior for a single image, then navigate to the View ▸ Guides and Grids menu item. Acorn offers snapping of layers, selections, and shapes to guides, canvas, layers, shapes, and grid. Holding down the control key while dragging a guide around will temporarily turn off snapping (and this trick works with most objects on the canvas too).
Changing snapping in the Settings will require quitting and re-opening Acorn to become effective. Turning on and off snapping options in the View menu become effective immediately.
Pro Tips
To temporarily disable snapping while you are dragging an object, hold down the control key.
To disable snapping, press ⌘⇧⌥; (Command-Shift-Option-;). To re-enable snapping, press ⌘⇧⌥; again. This setting is not saved with your image.
Note
Rulers, grids, and guides are not visible when you print your image. To preserve your grid and guide placement on your image, be sure to save in the .acorn file format.