Layers Basics
Overview
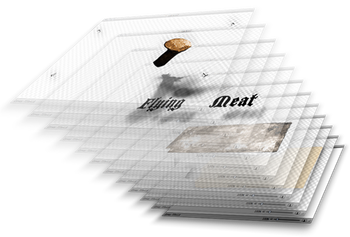
Layers are what make most image editors so powerful. Images are stacked on top of each other in the layers list. You see a flattened version of the layers in the canvas. If you take the text tool and write something on your image, you will notice that a new layer called a shape layer has been created. By using the move tool, you can move around this layer without affecting the layer underneath. Similarly, if you apply a filter it will only apply to the layer you currently have selected in the layers list. Using this properly will give you the best possible results, and will also allow you to be more flexible if you want to change something later. When in doubt, make a new layer.
Hiding and Renaming Layers
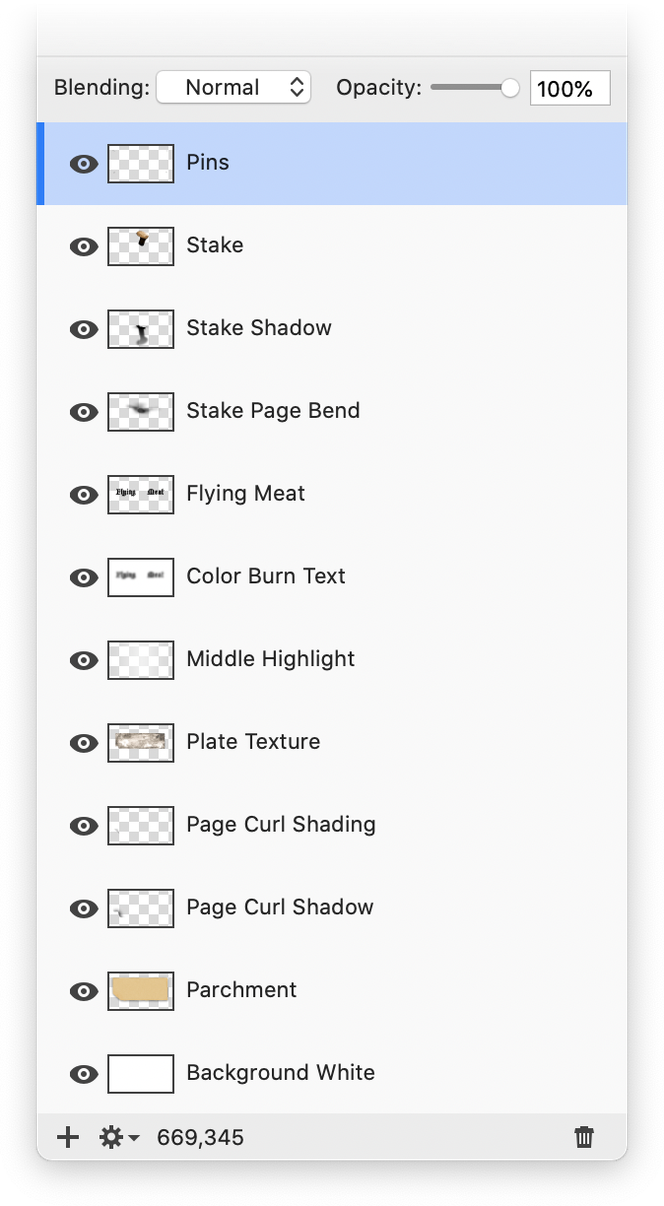
Layers can be hidden and renamed in the layers list. From left to right you can see a visibility mark (the eye), picture of the layer, and the title of the layer. Toggling the little eye next to the thumbnail layer will hide and display the layer, leaving all the other layers visible. Layer names can be changed at any time by selecting the layer then clicking on the existing text.
Pro Tip: To hide all other layers, select the layer you want to remain visible then hold down the option key while clicking the eye. To return all the layers to visibility hold down the option key while clicking the eye again.
Blending Modes and Opacity
Above the layers list there are layer blending options as well as the opacity slider. Opacity is the opposite of transparency. If you pull the slider all the way to the left, it will be 0% opaque and you will not be able to see the layer. If you pull it all the way to the right, the opacity will be 100% and you can see the layer at its fullest.
Layer blending modes can be difficult to understand. They control the way the layer that you have selected interacts with the layers below it. Multiply for example will make all the whites of the image transparent, but leave the blacks alone. Screen does the opposite of multiply by leaving the whites alone, but making all the blacks transparent. The best way to figure out what they do is to play with them or read the blending modes tutorial.
Adding, Deleting, Selecting, and Duplicating Layers
Adding & Deleting: Navigate to the menu item and you will find options to create a new layer (⇧⌘N), a new shape layer , and to delete the currently selected layer (^⌘-). An additional keyboard shortcut to delete the currently selected layer is ⌘⌫.
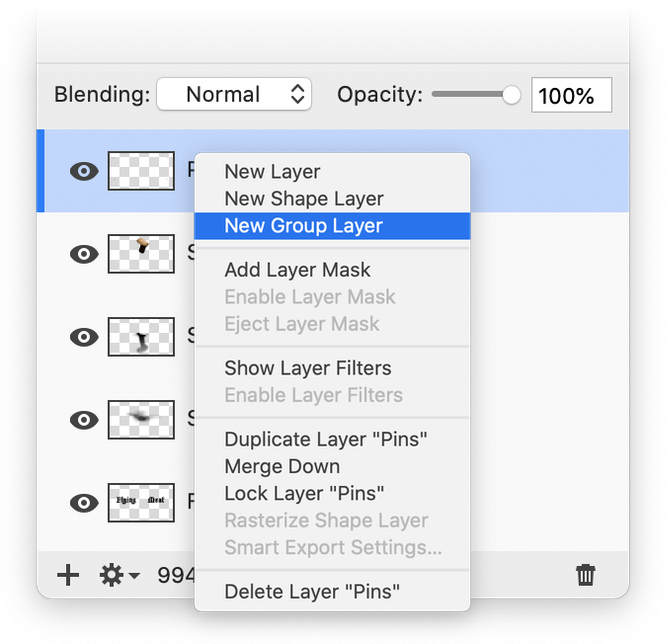
You can also right click (or control click) on your layers list to bring up a contextual menu with the options to create and delete layers. Below the layers list, there is a plus button. The plus button will create a new bitmap layer. On the bottom righthand corner there is a garbage can. Clicking this will delete the currently selected layer.
Selecting: To select a single layer in the layers list, just click on it. To select multiple layers you can hold down the command key while clicking on each layer you want selected. To select a range of layers, click on the first layer you want selected then hold down the shift key while clicking on the last layer you want selected.
Duplicating: To duplicate a layer, select that layer in the layers list. You can then right click on the layers list to bring up the contextual menu, or you can choose Layer ▸ Duplicate Layer from the menu. An additional method is to hold down the option key while clicking the '+' button in the inspector palette.
Grouping Layers
You can group layers together by creating a group layer in your layer list. A group layer works just like a folder. You can create a group by right-clicking inside your layers list to bring up the contextual menu, or you can choose the Layer ▸ New Group Layer menu item. An additional method is to hold down the command key while pressing the '+' button in the inspector palette.
If you have multiple layers selected and want to put them in a group, you can use keyboard shortcut command-g. If you have a group layer selected and would like to ungroup it, then use keyboard shortcut command-shift-g.
A folder icon will appear in your layers list. You can now drag your layers into this group layer. Notice there is an disclosure triangle next to the visibility icon. Clicking on this triangle will show or hide all the layers within this group.
You can rename the group folder by double-clicking the name and entering your own. Grouping layers is also a good way to move multiple layers at once.
Pro tip: If you have a group layer selected and you use the Edit ▸ Copy menu item, you will get a composite of the entire group layer on the clipboard.

Locking Layers
Locking layers is useful if you have an object on a layer that you do not wish to move. Locking the layer it rests upon will prevent you from making unwanted changes.
To lock a layer, right click on the layer you wish to lock. Then select "Lock Layer" from the menu. This is also available under Layer ▸ Lock Layer.
You will notice that a small lock icon appears in the right side of the layer.
Use the same process to unlock the layer.
Merging Layers
Layers can be merged in a few different ways. Layer ▸ Merge Down allows you to combine layers one at a time with the currently selected layer being merged with the one below it. Layer ▸ Merge Visible merges all layers that are not hidden into one single layer. Layer ▸ Flatten Image merges all layers regardless of visibility. Merging layers can be a good way of keeping your work clean and organized, but it also decreases your ability to change things later on. Consider using Edit ▸ Copy Merged and making a new image from the clipboard so that your layers can be preserved in the original file. Layer ▸ Stamp Visible (⌘⌥⇧E) will add a new layer, which is a composite of all the visible layers. The menu item for Merge Visible will switch to Stamp Visible when the option key is pressed.
Bitmap and Shape Layers Defined
In Acorn, there are two different kinds of layers that can be created. One is a bitmap layer and the other is a shape layer. Bitmap layers can be image files, pictures that you bring in from iPhoto, or things that you draw. In their simplest form they are a grid of pixels on the screen. Shape layers are more like a set of mathematical instructions rather than pixels. You can go back at any time in a shape layer and change the font, the colors, or the size easily.
Shape layers cannot be drawn on with the brush or erased using the eraser tool. Shape layers cannot be transformed using the transform tools. For example, if you want your shape to have a perspective transform applied, you would need to "rasterize" the layer. Rasterization is the process of turning a shape layer into a bitmap layer. Once a shape layer has been rasterized you lose the editing capability you have with shapes, but the bitmap tools become available to you. If your layer name originally started with "Shape Layer", Acorn will replace it with "Bitmap Layer" when you rasterize.
Important Word of Warning
JPEG, the format that most images are stored in, cannot have layers. Saving out to a JPEG will flatten all of the layers into one. If you would like to save your layers so you can come back later and do more edits, save as the file format .acorn.
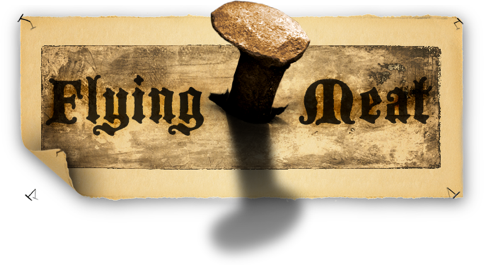
If you are curious about the project file used in this example, you can download it here: http://flyingmeat.com/fs/images/acorn/LayersDemo.zip.
Additional Relevant Documentation
Layers Basics Part 1 (video tutorial)
Layers Basics Part 2 (video tutorial)